How to Start a Blog as a Kid | Easy Step-by-Step Guide

Yes, kids can start a blog (with the help of a caregiver). In fact, you can start your blog in less than an hour. Become a blogger today with our easy, step-by-step guide.

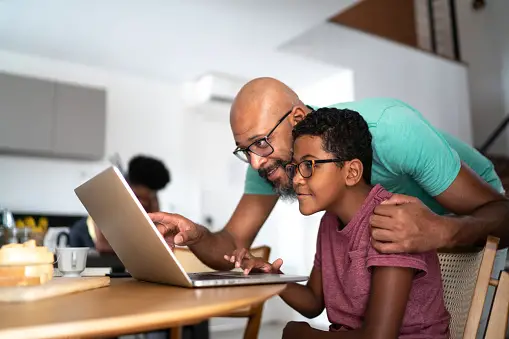
Important Note: Before you get started, you will need the approval of a parent or caregiver. They will have to participate in this process. They will need to sign the user agreement and use their credit card. 


Start a blog as a kid

Today, you will learn all about easily creating a blog on your own and how to start a WordPress blog. Blogging can change your life, earning you money while doing something you love. By starting young, you can really get ahead! You can start a money-making blog for just a few dollars a month! Below is a link to get started. You will also receive a free blog domain through this link too. 

Disclosure: We are affiliates for Bluehost, and will receive a commission if you sign up through our referral link. This is at no additional cost to you, and you will get great pricing and a free domain name through our link. 

Click here to start a blog, then use the tutorial below for easy, step-by-step directions.

Reasons for kids to start a blog

How to Become a Blogger as a Kid in 4 Easy Steps

Here are the 5 simple steps to starting your blog. We’ll go into more details below.

  1. Choose your blog name and get your hosting through Bluehost
  2. Pick a WordPress “theme” or style for your blog and install WordPress (easy 1-click process in Bluehost)
  3. Add some helpful plug-ins (Optional but recommended)
  4. Start writing and publishing! You’re now a blogger!
Can’t I blog for free as a kid? Why we recommend a WordPress blog on Bluehost.
Yes, there are free ways to set up a blog, but even for a kid, we don’t recommend it. Some free options that you might have heard of include Blogger and Wix. But there are so many reasons we think you should start with a WordPress blog on Bluehost. This is one of the biggest decisions you have to make when it comes to starting a blog, as it sets the foundation and has a huge impact on how you can grow and monetize your blog. And yes, we think you should be monetizing (or making money) off your blog, even as a kid blogger! Don’t expect to make money right away, but don’t sell yourself short! A kid blogger definitely can make money! But you have to set it up right. And that’s one reason we recommend this set-up: a WordPress blog hosted by Bluehost. This is called “self-hosting”, as opposed to Squarespace/Blogger/Wix/etc. There are so many advantages to having a self-hosted blog on Bluehost.
 
 
Kids Starting a Blog
10 Reasons for kids to start a blog on Bluehost:
  1. It’s extremely easy. We’ll show you how easy it is in the tutorial below. Most people can have it set up and running in less than an hour.
  2. It’s seamless with WordPress. WordPress is one of the most popular (if not the most popular) blogging platforms. Bluehost has an easy 1-click installation process for getting WordPress set up. And WordPress is free when you host through Bluehost!
  3. Being self-hosted through Bluehost makes your blog/website look more professional. When you use a free blogging platform, (Squarespace/Blogger/Wix), that name will appear in the URL. For instance, your website/blog URL will look like www.yourwebsitename.squarespace.com. When you’re self-hosted through Bluehost, it looks like a traditional website: www.yourwebsitename.com.
  4. With Bluehost, you also get free e-mail addresses that incorporate you blog name. Your e-mail address will look like YouChoose@BlogName.com. This adds to the professional look of your site. This likely won’t be needed in the beginning, but if your goal is to grow your blog or make a business out of it, this will definitely come in handy down the road.
  5. It’s SEO-friendly. SEO, or Search Engine Optimization is important if you’re looking to get seen. The more views you have, the more opportunity you have and the more money you can make. You are more likely to rank well on Google searches being self-hosted compared to using a free platform.
  6. Being self-hosted allows you to run ads on your website. This will make you money.
  7. Without getting too in-depth, being self-hosted with Bluehost gives you more options and flexibility with your blog. 
  8. It’s affordable. It’s less than $3 per month to host your blog with Bluehost, and you get your domain name free for the first year. Even as a kid, you can easily earn this kind of money by doing chores around the house or saving birthday money. 
  9. Being self-hosted sets you up for the best chance of success. If you’re going to be starting out this new hobby or business venture, you want to get off on the right foot. You want to make sure everything is working for you, not against you. You don’t want your efforts on your blog to be stifled by the limitations of using a free platform. And you definitely don’t want to have to worry about transferring your blog from a free platform to Bluehost/Wordpress down the road (we’ve only heard horror stories). Nearly every serious blogger uses a self-hosted WordPress site because of its creative freedom and flexibility.
  10. Bluehost has great technical support (luckily we’ve only had to use this once).
So hopefully we’ve convinced you why it’s important to have a “self-hosted” blog. There are several hosting sites out there, but we recommend Bluehost because it’s honestly one of the best. There’s a reason why so many bloggers use Bluehost for their website/blog. It’s also what we use, so we can give you our honest recommendation.
 
 Click here to start the process.  (Don’t forget you’ll need the help of an adult!)
 
Starting a blog as a kid

Easy Step-by-Step Guide for Kids | Starting Your Blog

We’ll walk you through each of the 5 steps to getting your blog set up again.

  1. Choose your blog name and get your hosting through Bluehost
  2. Pick a WordPress “theme” or style for your blog and install WordPress (easy 1-click process in Bluehost)
  3. Add some helpful plug-ins (Optional but recommended)
  4. Start writing and publishing! You’re now a blogger!

1. Choose your blog name and get your hosting through Bluehost

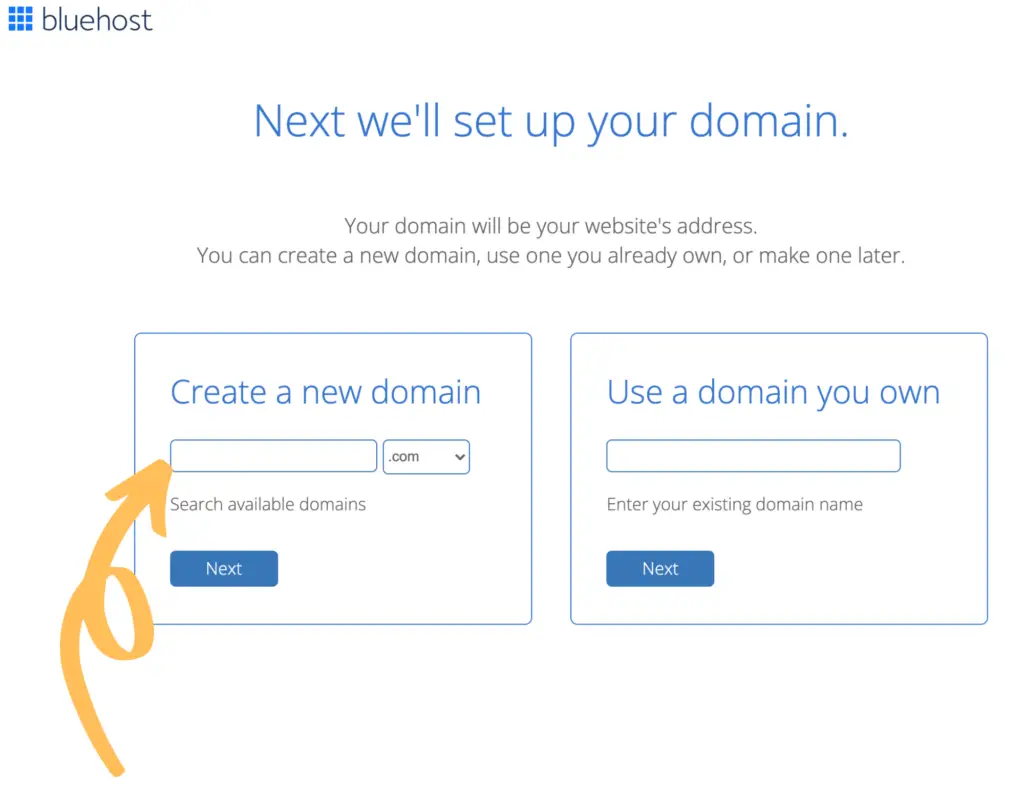
The first step is coming up with a blog name. This is also called the domain name and will show up in the website URL (www.domainname.com).

Once you pick your domain name, it can’t be changed, so this is an important step.

So what do you want to name your blog? Take your time in coming up with a blog name you’ll be happy with. Your blog name could be your name or your (future) business’ name. Do you know what you plan to write about? If so, your blog name could relate to that specific topic. If you don’t know what you plan on writing about, plan to cover a variety of topics, or think you may want to change the topic down the road, that’s ok too! You could come up with a fun, silly or random name for your blog! Make sure you get your parent’s approval when choosing a blog name! 

Starting a blog (as a kid)

Picking a blog name is also tricky because you can’t use anything that’s already taken. So don’t get too set on any specific blog name until you run it through Bluehost website to see if it’s available.

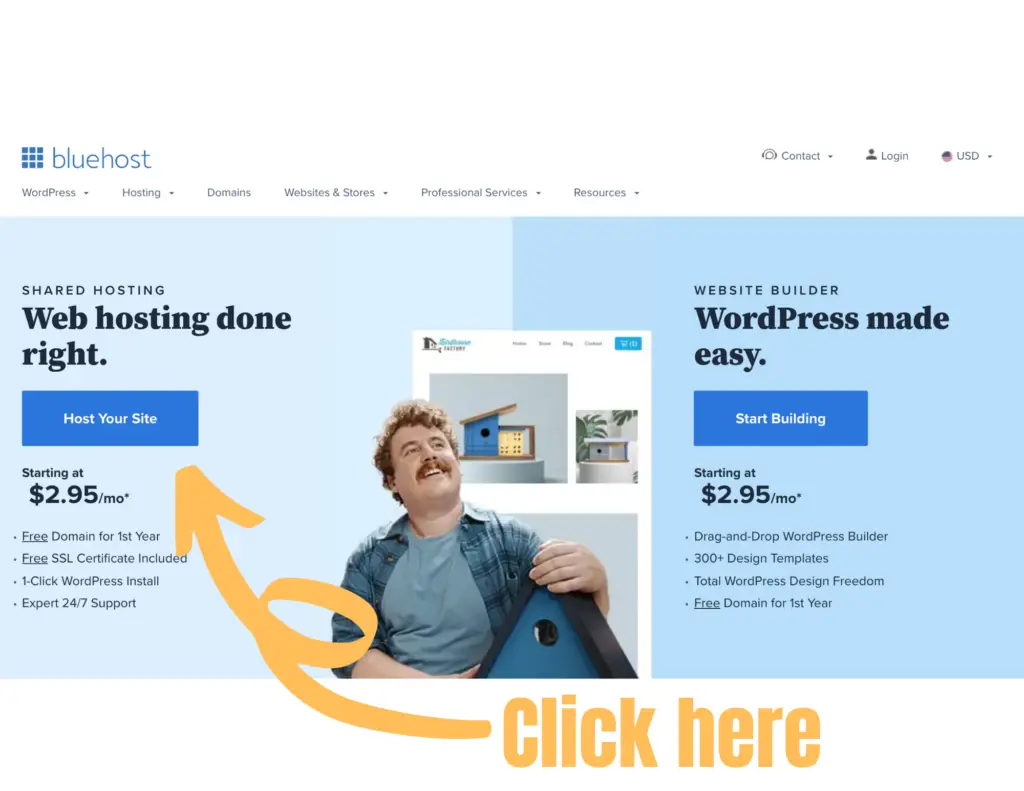
To see what names are available and get your hosting through Bluehost, click HERE.

You will see this this screen. Click “Host Your Site” on the left hand side:

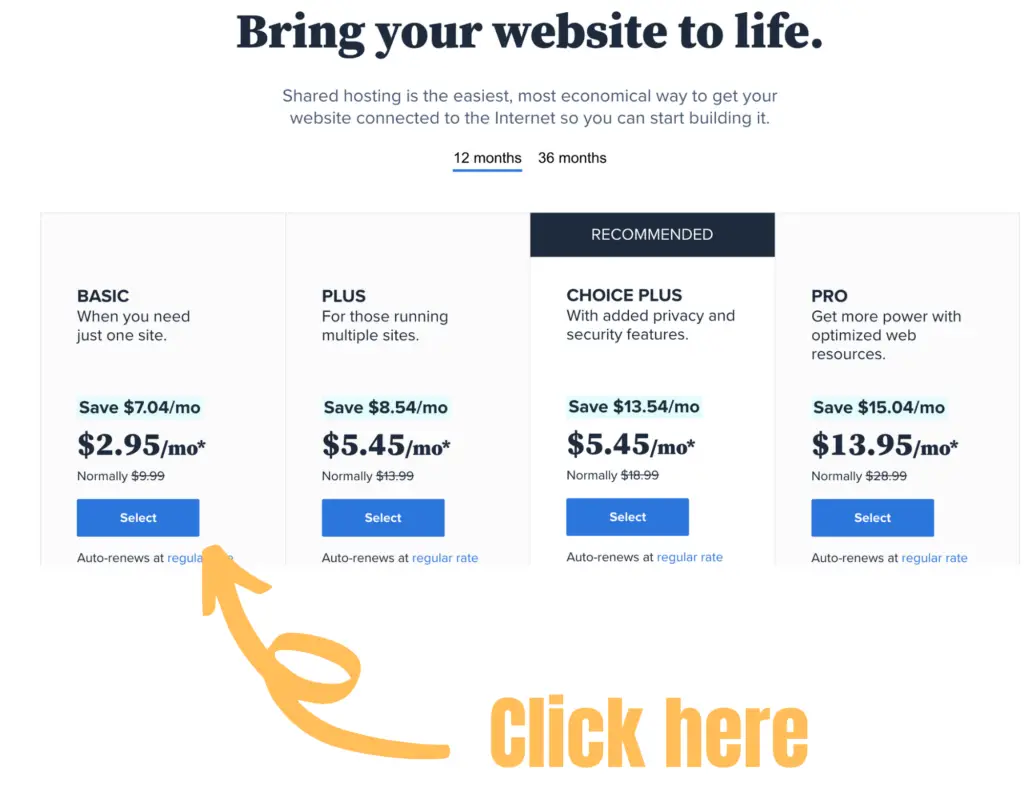
Next, you can choose your plan. You can see that Bluehost offers a variety of plans. For most kids or teens starting out, the “Basic” plan will be your best (and cheapest) option. 

Once you select your plan, you can start playing around with different blog (or domain) names to see if they are available. Not only can you pick your blog name, you can decide if you want a .com, .biz, .org, .info, .space….the list is long! We like that if your blog name is not available, Bluehost will give you some alternative ideas that are available.

Once you pick your blog name (and it’s available), you can finish setting up your account. This is where you need a parent or guardian. Per the Bluehost user agreement, “The Services are intended solely for users who are eighteen (18) years of age or older. Any registration by, use of or access to the Services by anyone under eighteen (18) is unauthorized and in violation of this Agreement. By registering for or using the Services, you represent and warrant that you are eighteen (18) years of age or older.” 

This is also the point in the process where a credit card is needed. You have to pay for the first year’s hosting upfront. If you use our special link, for the 12 month Basic plan, this will cost $35.40. 

We also recommend adding on Domain & Privacy Protection for an additional .99/month. 

Parent and Child Blog - How to start

2. Pick a WordPress "theme" or style for your blog​ & Install WordPress (easy 1-click process in Bluehost)

This step is super easy. Bluehost makes it painless to “install” WordPress, the blogging platform.

Once you create your password, Bluehost will guide you through exactly what you need to do in order to start your WordPress blog.

First, you will pick your “theme” or style for your blog. There are tons of options (both free and ones that cost money). 

Once you’ve picked your theme, continue to follow the prompts.

And that’s it! You’ve set up the website for your blog!


Starting a blog as a kid

3. Add some helpful plug-ins (Optional but recommended)

This next step is optional, and can be done now or later.

There are tons of third-party plug-ins you can add to your site.

To add plug-ins, go to your WordPress dashboard, find “Plug-ins” on the left hand side, and click “Add New”. Next, search for any Plug-in you want to install. Click “Install”, followed by “Activate”. 

After trial and error over many years, there are a couple plug-ins we recommend off the bat:

  1. Google Site Kit: This is a one-stop shop to link your blog to Google, including Google Analytics and Google AdSense. Linking your site to Google Analytics is important so you can see how many people are on your site and what they’re reading. Google AdSense is a great way for beginner blogs to monetize, or make money. Google Site Kit is free to add.
  2. Elementor: Elementor allows you to customize your blog posts in more ways than your theme may permit. It’s a very intuitive and easy-to-use website builder with drag and drop features. Elementor has a limited, free version, but we pay for the Pro version. Definitely start out with the free version.
parent helping child blog

5. Start writing and publishing! You're now a blogger!

Now that your website is all set up, the real fun begins. Start writing those blog posts!

Remember, Bluehost is technically for ages 18+, so work with a parent or caregiver to figure out how to move forward. Perhaps you can write your blog posts elsewhere (like on a Word doc, or Google doc), then you can work with the adult in your life to get your post transferred over to your WordPress blog and published on-line.

Make it yours! Turn your vision into a reality.

Have fun trying new things! This is sure to be a fun, challenging and rewarding ride. Enjoy the journey!

You’re now a blogger!

Teen starting a blog

Subscribe!

Get the latest posts and more from The Modern Mindful Mom!